
Medical Clean Board Installation and Maintenance Guide
July 2, 2026
Installing and maintaining medical clean board systems correctly determines their long-term performance in sterile environments. This guide addresses the practical challenges faced by project managers, contractors, and facility engineers when deploying medical clean wall board in hospitals, pharmaceutical plants, and cleanrooms. Proper installation techniques prevent contamination risks, while systematic maintenance protocols preserve antibacterial properties and extend service life. Understanding substrate preparation, joint sealing methods, and cleaning schedules ensures your medical clean interior wall panel investment delivers consistent infection control and regulatory compliance throughout decades of demanding use.

Why Proper Installation Matters for Sterile Environments
Surfaces that can prevent bacterial colonization are a cornerstone of hospital hygiene. Medical clean board is different from the conventional materials; it needs to be installed in such a way that there are no dust accumulation zones and moisture infiltration sites. Gaps as small as 0.5mm that can harbour germs can compromise the benefits of the antimicrobial surface. Healthcare sanitation requirements require that continuous, non-porous barriers be used so that cleaning products can contact every square centimeter of a surface without having to go behind panels.
Project delays often occur due to poor assessment of the substrate. If the walls have more than 12% moisture content, they will deform in months. Concrete surfaces require flatness tolerances less than 2mm per meter to avoid panel buckling. For industrial facilities administering biohazard management measures, there is no room for error. Tools like laser levels and moisture meters can be used before installation to spot problems before mounting begins, saving both time and money.
In pharmaceutical manufacturing with temperature variations, thermal expansion coefficients are significant. To avoid stress fractures during heating cycles, be sure to leave expansion joints of 3-5mm every 6 meters. The use of fungicidal silicone to seal these seams ensures the integrity of cleanroom protocol, while allowing the mobility of materials. The failure to allow for expansion results in delamination of the panels, especially in food processing areas where refrigeration equipment is installed.
Pre-Installation Checklist: Setting Up for Success
Begin with substrate assessment. Gypsum board, concrete, and masonry each require different fastening approaches. Gypsum substrates need reinforcement strips at panel edges to handle weight loads. Concrete walls demand impact-resistant anchors spaced every 300mm vertically. Moisture barriers become essential in basement-level operating rooms where groundwater pressure exists.
When installing a medical clean board, first acclimate panels to ambient conditions for 48 hours before installation. Bringing materials directly from cold storage into heated spaces causes condensation between layers, promoting mold growth invisible until months later. Stack panels horizontally on level surfaces, avoiding direct floor contact. Facility managers overseeing multiple renovation phases should coordinate delivery timing with HVAC system activation.
Tool preparation separates amateur installations from professional results. Carbide-tipped circular saw blades minimize edge chipping when cutting calcium silicate cores. Variable-speed drills prevent overheating during fastener insertion. Laser alignment tools ensure vertical plumb across wall expanses exceeding 10 meters. Teams working in surgical clean room environments must use HEPA-filtered vacuum attachments to capture silica dust immediately.
Step-by-Step Installation Protocol
Foundation Framework Construction

Steel or aluminum framing systems provide the structural skeleton. Vertical studs at 400-600mm spacing support panel weight while maintaining dimensional stability. Horizontal runners at floor and ceiling levels anchor the entire assembly. Use corrosion-resistant galvanized steel in pharmaceutical facilities where disinfectant aerosols accelerate oxidation. Laser levels confirm each stud achieves true vertical alignment—deviations multiply across panel heights.
Integrate utility chases within the framing depth. Electrical conduits, data cables, and plumbing runs hide behind panels without surface penetrations. Coordination with MEP (Mechanical, Electrical, Plumbing) teams prevents last-minute drill-throughs that compromise the antimicrobial surface. Install backing plates at known fixture locations—wall-mounted monitors, hand sanitizer dispensers, and signage brackets need solid reinforcement.
Panel Mounting Techniques
Apply adhesive in continuous 10mm beads along stud contact lines, avoiding intermittent dots that create voids. Pneumatic pin nailers or self-tapping screws at 300mm intervals secure panels during adhesive curing. Position fasteners 15mm from panel edges to prevent cracking. Stagger vertical joints between adjacent rows, never aligning seams directly above each other—this pattern distributes structural stress and enhances aseptic technique compliance.
Cutting panels requires dust containment measures. Score the UV antibacterial coating surface with utility knives before sawing through the calcium silicate core. This prevents coating delamination at cut edges. Seal all exposed core edges with manufacturer-supplied edge sealant before installation. Laboratories focused on pathogen elimination cannot tolerate raw substrate exposure where moisture infiltrates.
Joint Treatment and Sealing
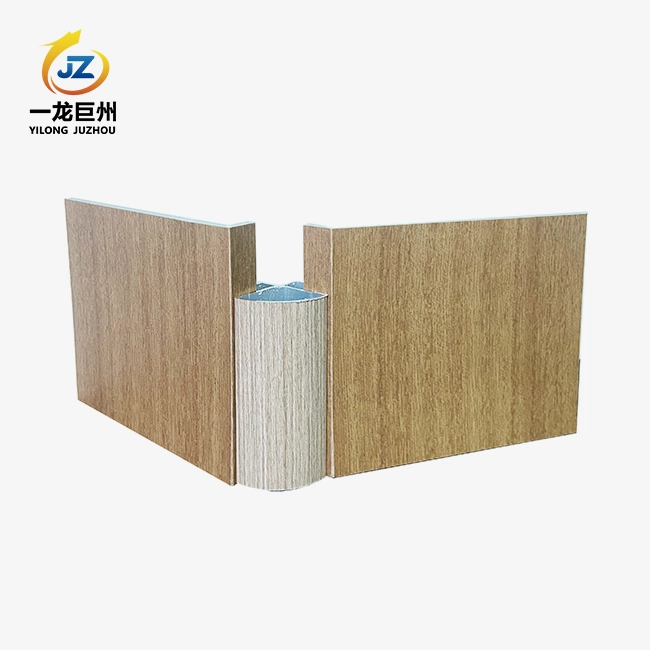
Three-piece aluminum trim systems create flush transitions at inside corners, outside corners, and vertical seams. These profiles accept panel edges within channel grooves, concealing fasteners completely. Apply neutral-cure silicone rated for hospital use within channels before snapping trim caps into place. Smooth excess sealant with radius tools, creating 3mm concave fillets that prevent cleaning solution pooling.
Horizontal joints at ceiling and floor transitions need flexible sealants accommodating building settlement. Polyurethane-based products maintain elasticity through temperature cycles better than acrylic alternatives. Color-match sealants to panel finishes—visual continuity matters in patient-facing areas where clinical cleanliness perceptions influence satisfaction scores. Contamination prevention strategies succeed when installation details communicate meticulous attention.
Daily and Periodic Maintenance Protocols
Routine Cleaning Procedures
Microfiber cloths with 70% isopropyl alcohol remove common soiling without abrading the surface sterilization layer of the medical clean wall board. Wipe in overlapping horizontal strokes from ceiling to floor, preventing drip lines. Quaternary ammonium disinfectants approved for medical use dissolve protein-based contaminants from blood or tissue. Avoid phenolic cleaners exceeding 5% concentration—they yellow UV-cured coatings over time.
High-traffic corridors need twice-daily cleaning cycles. Automatic scrubbers with soft brush heads expedite large area maintenance while controlling solution application rates. Ensure machine settings limit water pressure below 40 PSI to prevent seam infiltration. Facilities managing medical waste disposal near wall surfaces should increase cleaning frequency, addressing splashes within 30 minutes to prevent staining.
Quarterly Deep Maintenance
Inspect joint sealant integrity using flashlight rake lighting that reveals separation gaps. Silicone degrades under UV-C sterilization equipment exposure, requiring reapplication every 18-24 months in operating theaters. Test surface hardness with pencil scratch tests at hidden locations—readings below 3H indicate coating wear requiring manufacturer consultation. Cleanroom certification audits often include surface condition assessments where maintenance records prove compliance diligence.
Check fastener torque at sample locations across installations exceeding 500 square meters. Vibration from adjacent mechanical equipment loosens screws gradually. Re-torque loose fasteners immediately—panel movement creates micro-gaps where biofilm accumulates. Document maintenance activities with date stamps and technician signatures, creating audit trails for hygiene compliance inspections.
Addressing Damage and Repairs
Small scratches respond to manufacturer-supplied touch-up pens containing matched antibacterial coating. Clean the area with alcohol, apply the product in thin layers, and cure under natural light for 24 hours. Deeper gouges penetrating the substrate require panel replacement. Cut out damaged sections to the nearest stud centerline, install backing supports, and mount new panels following original installation protocols.
Impact damage from equipment collisions often cracks substrates without visible surface harm. Tap panels with a rubber mallet, listening for hollow sounds indicating internal delamination. Replace compromised panels proactively—hidden voids trap moisture, breeding mold that compromises patient safety despite intact outer surfaces. Facility teams emphasizing infection control understand that prevention costs less than remediation.
Troubleshooting Common Installation Issues
Panel Warping and Buckling
Excessive adhesive application creates uneven curing pressures. Panels bow outward at the centers while the edges remain flat. Solution: Remove affected panels within 48 hours before the adhesive fully cures. Clean studs thoroughly, reapply adhesive in the recommended bead patterns, and reinstall. Moisture intrusion causes similar symptoms—identify and repair leaks before reinstalling materials.
Visible Seam Lines
Inconsistent joint widths result from framing irregularities or poor panel cutting of a medical clean interior wall panel. Seams exceeding 5mm appear as dark lines even after trim installation. Prevention requires a laser-guided panel layout before cutting. Remediation involves removing trim, shimming studs to reduce gaps, and reinstalling with precision measurements. Architectural projects demanding aesthetic excellence cannot tolerate visible seams in public-facing spaces.
Coating Delamination
Improper surface preparation allows contaminants to remain between the substrate and the coating. Delamination appears as bubbling or peeling within months. Demand factory certifications confirming coating adhesion test results before accepting shipments. Storage in direct sunlight or freezing temperatures also causes premature failure. Warehouse conditions matter—specify climate-controlled storage in procurement contracts.
Long-Term Performance Optimization
Schedule annual assessments with qualified inspectors familiar with cleanroom standards. Thermal imaging cameras detect moisture intrusion invisible to visual inspection. Air quality testing confirms HEPA filtration efficiency remains uncompromised by surface particle shedding. Proactive monitoring identifies degradation trends before they escalate into system failures requiring extensive renovation.
Maintain relationships with installation contractors beyond project completion. Warranty claims process faster when original installers assess issues firsthand. Their familiarity with your specific installation details—framing methods, adhesive types, environmental conditions—enables accurate diagnosis. Negotiating multi-year maintenance contracts during initial procurement provides cost predictability and priority service access.
Document cleaning product efficacy through ATP (adenosine triphosphate) swab testing. Surfaces registering below 10 RLU (Relative Light Units) indicate effective pathogen elimination. Rotate disinfectant chemistry quarterly to prevent microbial resistance development. Data-driven maintenance strategies satisfy sterilization equipment auditors while optimizing labor allocation across facility square footage.
Conclusion
Successful medical clean interior wall panel installations balance technical precision with practical maintenance planning. Substrate preparation, framing accuracy, and joint sealing determine initial performance. Daily cleaning protocols and quarterly inspections preserve antimicrobial properties across decades. Project teams prioritizing infection control recognize that installation quality directly impacts patient outcomes and regulatory compliance. Investing in proper techniques today prevents costly failures tomorrow, ensuring sterile environments maintain integrity throughout their entire service life.
Partner with YILONG JUZHOU for Expert Medical Clean Board Solutions
YILONG JUZHOU manufactures medical clean board systems engineered for demanding healthcare and pharmaceutical applications. Our factory-direct supply eliminates distributor markups, delivering ISO and CE-certified panels with 99.99% antibacterial rates. Request free samples via cnyang2000114@gmail.com to evaluate our UV-cured finishes against your project specifications. With 50,000m² stock and 3-7 day production cycles, we support tight construction schedules across 30+ export markets.
References
1. Healthcare Facilities Today. (2023). Best Practices for Antimicrobial Surface Installation in Medical Environments. Healthcare Infrastructure Press.
2. International Organization for Standardization. (2022). ISO 14644-1: Cleanrooms and Controlled Environments Installation Standards. ISO Technical Committee.
3. American Institute of Architects. (2023). Guidelines for Medical Facility Interior Surface Selection and Maintenance. AIA Academy of Architecture for Health.
4. Pharmaceutical Engineering Society. (2022). GMP-Compliant Wall System Installation Protocols for Sterile Manufacturing. ISPE Baseline Guide Volume 7.
5. National Institutes of Health. (2023). Surface Material Impact on Hospital-Acquired Infection Rates: A Meta-Analysis. NIH Clinical Research Journal.
6. Building and Construction Authority. (2022). Technical Standards for Hygienic Wall Panel Systems in Healthcare Infrastructure. BCA Singapore Publications.

Send Inquiry

Related Industry Knowledge
- PE Aluminum Composite Board Sheet: Sizes, Specs and Uses
- Cladding Paint Aluminum Composite Panel Coating
- Unlock the Power of Aluminium Composite Panel
- What is the difference between an aluminum composite panel and an aluminum sheet?
- Where to buy aluminum composite panel?
- How do I choose the right aluminum composite panels for my building?
- Antibacterial wall panel medical rigid sheet wall protection
- What are the common issues faced during aluminum panel installation, and how to avoid them?
- How to cut an aluminum composite panel?
- What safety precautions should I take when cutting aluminum composite panels?